In photography, a common problem that inevitably confronts everyone, is exposing properly for both super bright and super dark areas at the same time. I especially notice it when taking landscaping shots. It is hard to get correct exposure for things in shadow, things in direct sun, and the sky all at the same time. The range of tones your camera can capture all at once is only so much. Usually what happens to me is my landscape is exposed correctly while my sky just becomes a solid white color with no detail. Like here:

Essentially, HDR solves this problem. It allows you to take one shot exposed for the sky, one for the landscape, and really however many you want, and then combine them. More exposures means larger range. If combined properly, you can bring out all the detail in the shadows, and in the highlights at the same time. For my HDR image of the photo above I used this exposure plus four others, 2 lower and 2 higher.
Keep in mind that you can get these different exposures in 2 different ways. One way is to use a tripod and actually take the picture several different times with different exposures. This way you have to make sure everything stays perfectly still. It is best to use auto exposure bracketing if you've got it, and take the pics in quick succession. The second way to do it is by simply taking one photo using RAW format, and change the exposure after the fact. Export each exposure you want to a jpeg for combining later. If you do it this way, I have found that you need to keep your ISO low because noisy images wont combine well. The HDR will only accentuate the noise. 400 or lower should do.
The program I use to combine my exposures into an HDR is photomatix. Combining exposures is really all this program does. Open all the images up and hit combine into HDR. Once you do this the program will spit out an image that looks funky. This is because it contains much more information then your monitor can even display at one time. If you hover over it you will see a little preview box that will show the different ranges of the image. It is hard to explain but you will see.
In order to get this image back to something you can actually display on screen you have to tone map it. This is also done in Photomatix. An easy way of thinking about it is taking a wide range of tones (wider then can be shown by the monitor) and converting it back to a range that can be shown in a regular jpeg. However, this jpeg is special because you get to choose how each different area of the image will be exposed.
The full settings and explanation of how I do this is contained in the previous post to this one.
Tone map to your hearts content. Mess with the settings till you get something you like.
My image from above came out as this once I got all the exposures combined into one:
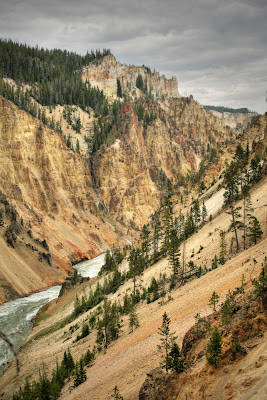
As you can see it brings out way more detail in the overall image, and my sky and and lanscape are both exposed properly.
Please try it out, and share your best in our gallery. The best ones will be featured here for all to enjoy.


No comments:
Post a Comment