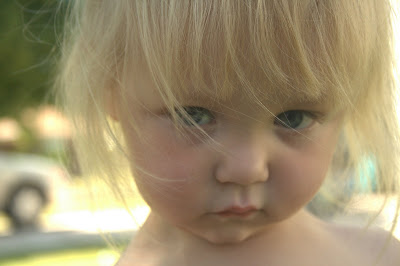
It doesn't look like much, but the one thing I tried to do is get some really bright exposure behind the subjects face. I also made sure to take this in RAW format so I could expose it even more after the fact. You can do this when you open RAW images using photoshop. All I had to to get the exposure correct was make sure the subject was in shadow, and the scene behind her was in full sun. I exposed the camera for her face, which in turn blew out the background.
After I took the shot I took the RAW into photoshop and further exposed the picture. I gave it kind of a high key effect by making the whole image a little bit overexposed, even on the face. The only other photoshopping I did was a saturation layer with some masking, a crop, and some sharpening. I will describe the step by step.
The Hue/Saturation layer can be created by going to layers>new adjustment layer>hue saturation. Turn down the overall saturation to your liking. Now, the reason we use an adjustment layer is so we can mask out the adjustments we just made. This means we can make the hue/saturation apply to only parts of the image and not the whole thing. What I did is masked out the rosy cheeks, lips, and eyes. This means the whole image is desaturated, except for the parts I masked out. This makes them the focal point of the picture. You mask things out by painting black into the mask where you don't want the adjustments to apply.
I use the crop tool to crop it. I made sure to crop it to a standard proportion because I wanted to print it. Framing something that is not standard can be really expensive, but if your print is standard it can be done for dirt cheap.
Then I sharpened. There are several different ways to sharpen in the filters>sharpen menu. What I like to do however is use a high pass filter. Copy the entire image to a new layer by selecting the top layer then hitting CTRL>SHIFT>ALT>E. This merges the whole image and copies it to its own layer at the top of the stack, without changing all the layers below. Use the newly merged layer to do the high pass. Go to filters>other>high pass. Set it to about 90, then change that layers blending mode to soft light. Adjust the opacity of that layer up and down to minimize or maximize the effect. Too much can be bad, but doing it correctly really brings out detail.
Here is the final result. I was very pleased with this result. For me it is a perfect addition to the home gallery. I like the lighting effect because it almost looks like it was taken in a studio with a white background, but really it was just out on my front lawn.


4 comments:
nice work. simple yet very effective and catchy effect. congratulations :)
IMHO there's really no improvement at all compared to the original, which would certainly stand out perfectly with a nice custom Curve and some milder use of Levels, perhaps toning down the environment a bit more to put the emphasize on her lovely soft face just a little bit more.
im just can't do that..what a day
nice tutorial.
Post a Comment